Colour Chase Challenge (White)
January - White
For the last few months on Instagram I had seen images posted with a colour theme for each month. I found the Color Chase Challenge group on Facebook, which has information on the different colours for each month. You can post your images in the Facebook group, and also share and tag on Instagram as well.
I thought this would be a great project for 2018, and am aiming to do 9 images for the month so I can put them in a grid. At the end of the year I plan on printing a book with the grid and images, and also print one big canvas with the grids.
January’s colour is white, which is an easy colour to start off with. My first thought when I saw the colour was our dog Luna, who is a Japanese Spitz and a big ball of white fluff!! As she is still a pup and very energetic I wasn’t quite sure how well she would do at sitting still for the camera. To my surprise she did really well, and it went better than expected.


I love flatlays and decided to play around with some fresh blueberries and meringues that were left over from Christmas. It was fun coming up with different ideas and compositions.


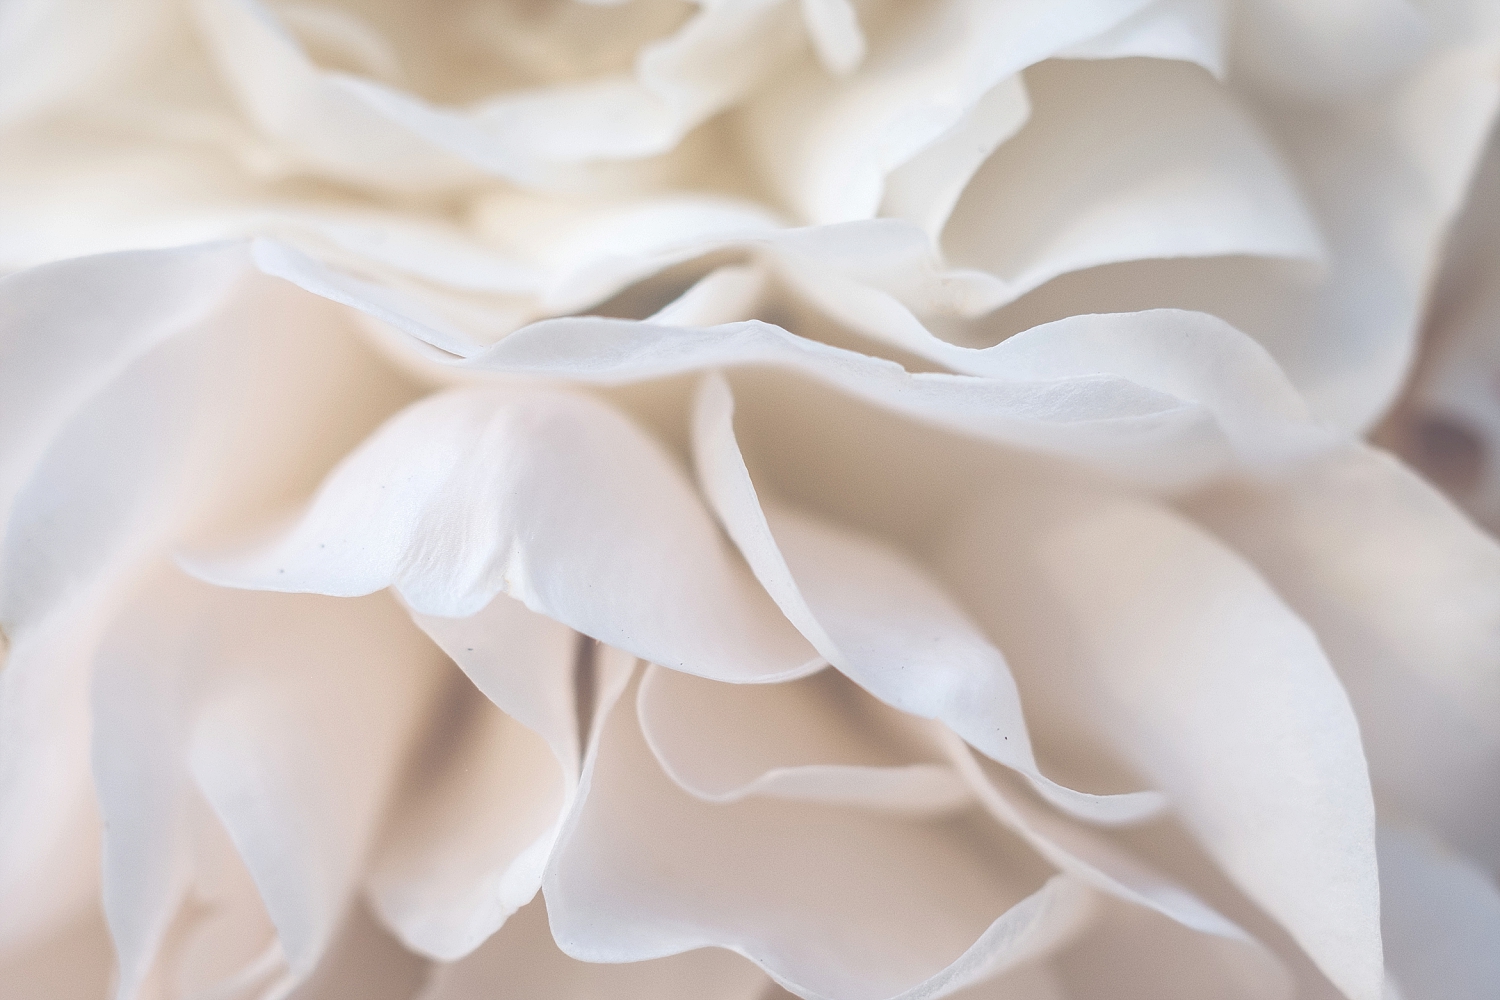
These white roses are from outside my bedroom window, it’s so nice to open the curtains and see them each morning. Both images were taken with my Vivitar 55mm F25.8 macro lens.

My finished grid of 9 images for white.

Unicorn Birthday Party
Unicorns seem to be the craze at the moment for young girls, so I wasn’t too surprised when Little Miss M asked for a Unicorn themed birthday party. I have being loving all of the unicorn cakes that come up on my feed, so was quietly excited that I got to make one.
Her birthday cake was a 7” chocolate cake with chocolate ganache, and covered in fondant. The unicorn horn was made from yellow coloured gumpaste, and then painted with gold edible paint. Little Miss M picked out the colours for the mane and I piped the buttercream onto the cake using a Wilton 2M tip.


When I made the unicorn horn for the cake, I also made little unicorn horns for the cupcakes and cakepops. I left these for a few days to harden and painted them also with the gold edible paint. The ears for the unicorn cake, cupcakes and cakepops were made with fondant and a little bit of Tylose mixed in. These were also made a few days ahead of time to give them time to harden, as I didn’t want the buttercream to make them soft.


The vanilla cupcakes were iced with buttercream coloured with Americolor Soft Pink and Americolor Avocado . When I pipe with buttercream I always put the buttercream on plastic wrap, roll into a tube and then put this in the piping bag. Then when I have finished I pull the plastic wrap out and dispose of it, and the piping bag is still relatively clean. In this instance I made two small plastic wrap tubes - 1 pink and 1 green and put both into the piping bag. Then when I was piping it swirled the two colours together.

I was dreading the cake pops as I knew trying to get the unicorn horn and little ears on them was going to be a fiddly job. It wasn’t nearly as bad as I had thought, as I used melted white chocolate to put the horns and ears on, and they stuck like glue. In fact, the cakepops were my favourite thing on the dessert table.

On our trip to the gold coin shop to get supplies, my daughter found the green and white polka dot popcorn cases to use as the goodie bags. We put some tissue paper in them, and filled them up with some treats for her friends.
I found the following printables on Pinterest -
Unicorn Poop – I printed the tag onto sticker paper, cut them out, and then peeled and attached to Tic Tac containers.
Rainbow Seeds – I used skittles to fill little bags and then printed and stapled the labels onto the bags. When I was filling the bags I had them on kitchen scales so each bag had exactly the same amount of Skittles, so no need to count them.

My Baking Buddy
Even after having trees around the house cut down, my kitchen is still quite dark, small and cluttered. I do dream of a nice modern clean Pinterest kitchen with perfect light, but alas it is what it is. My Mum has a beautiful white modern kitchen with lots of light and windows, and I do take the kids around there when we make gingerbread men at Christmas to take photos.
So…I was getting ready to bake my nieces 16th birthday cake when my daughter asked if she could help. Cake decorating is also a hobby, and I can get a little OCD on how things are done.
But this time I said yes, and how can you say no when she comes out in her cute little apron and Hello Kitty whisks.
I’m happy to report there were no egg shells in the mixture, most of the flour went in the pot, and as per usual when it came to clean up time she was nowhere to be seen.


Still mixing everything together with her Hello Kitty whisk.

I told her that she could make cupcakes from the left over cake batter.

The butter has melted, and mixing everything this time with the big whisk.


All mixed together, and in the cupcake liners.

This is when she disappears and I'm left to do all of the cleanup...hmmmm

Ombre Buttercream Cake
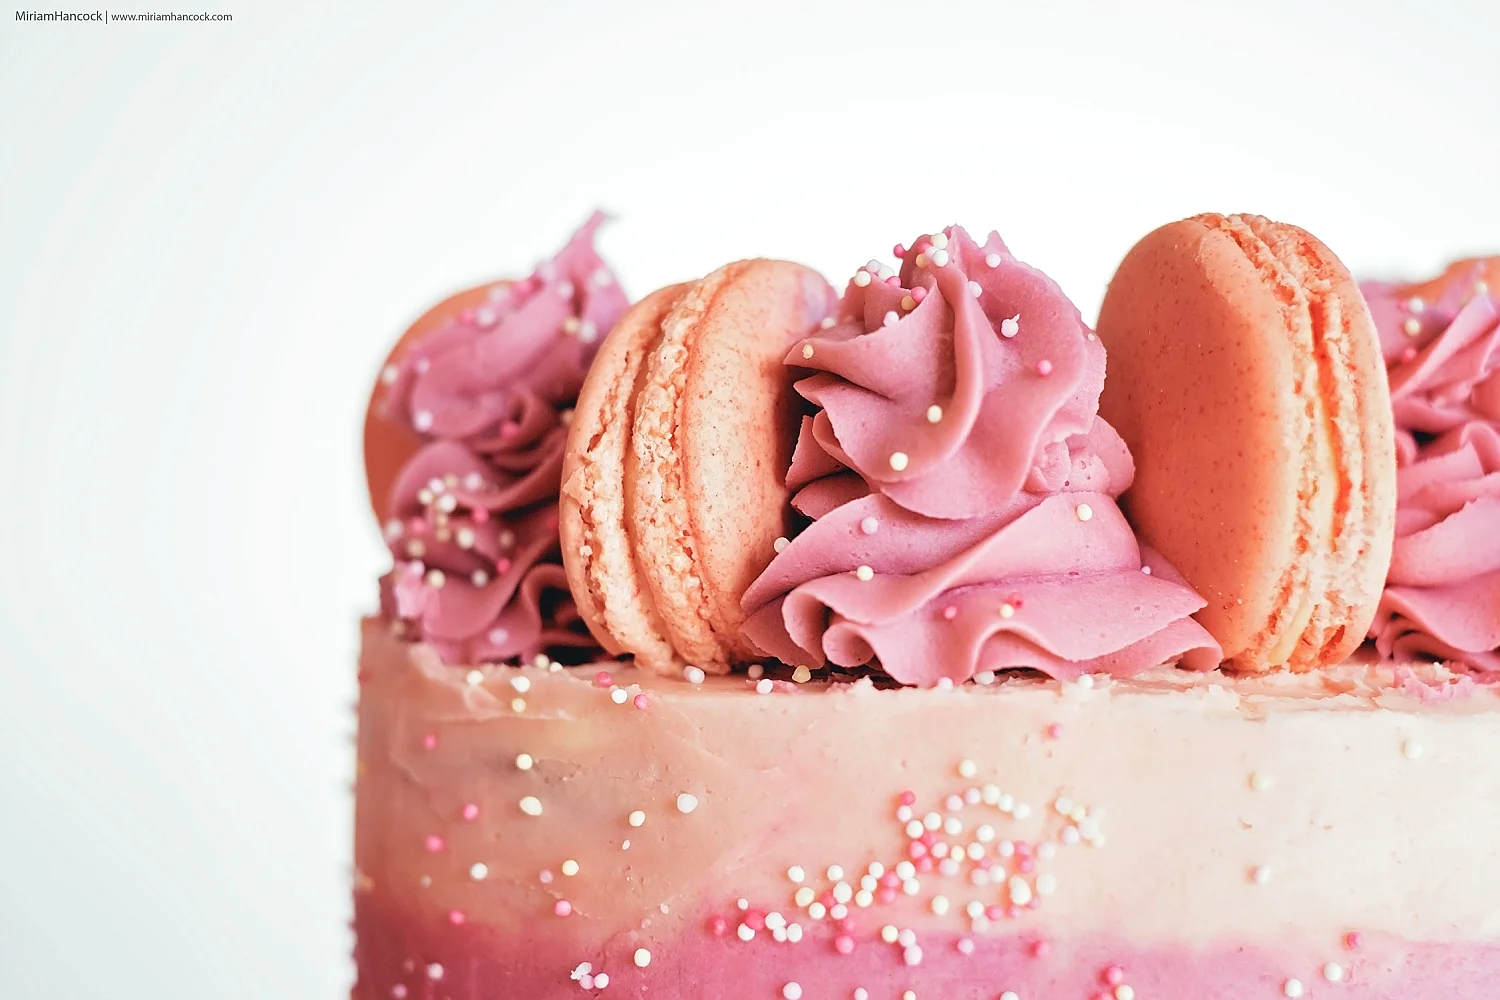
For my Mother In Law's birthday cake I decided to change from the normal ganache and fondant to buttercream. The cake was a caramel mud cake, which I layered with leftover white chocolate ganache, and toffee sauce. I then made my usual buttercream, and coloured it in 3 colours to make the ombre effect.


After icing the cake, I placed the macarons on the top of the cake. I would love to say that I made the macarons, but they were store bought. Using a Wilton 1M tip I piped swirls of buttercream between the macarons, and covered the cakes with sprinkles.

Pink, White, and Gold Birthday Party
Last year I planned to do a cute ballerina themed birthday party for my daughter. I had pins on my Pinterest board with pink themed dessert tables, pink ballerina cakes and other pink food goodies.
Planning was going well…until my daughter attended her friend’s birthday which was Frozen themed. So of course, my daughter wanted a Frozen themed party as well……sadly I had to say goodbye to my pink décor and embrace the blue!!
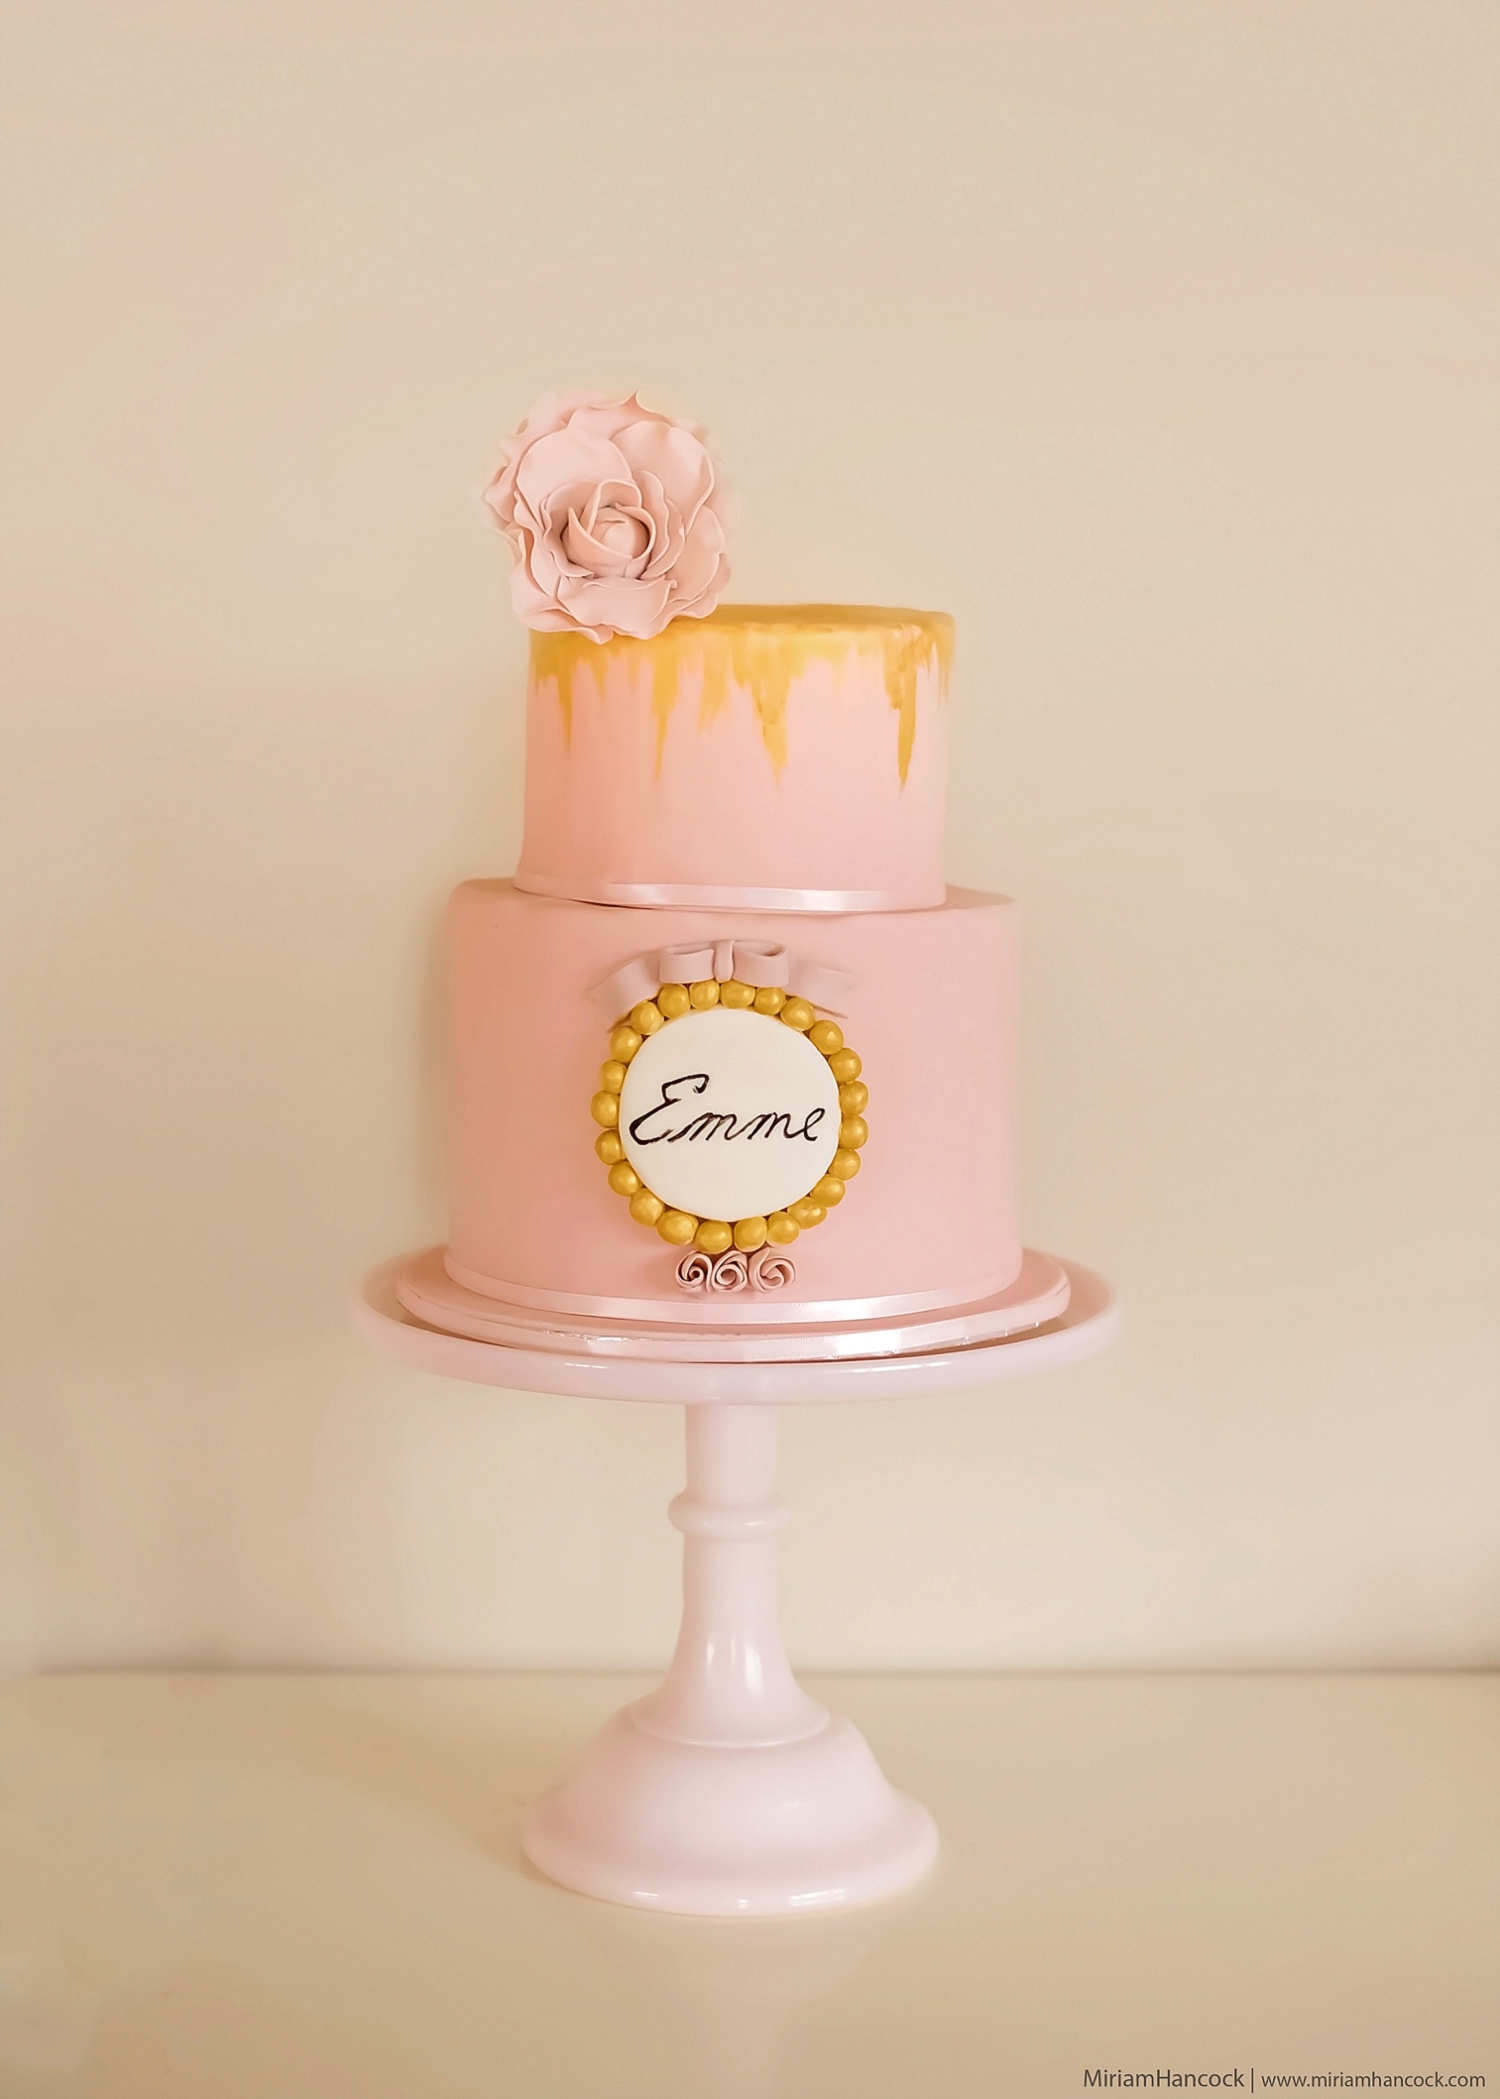
This year she didn’t mention anything about a particular theme, so I decided to go with Pink, White and Gold which seems to be popular at the moment. The good part was no figurines to make, as they are not my strong point.
I decided to go with a 7” chocolate cake, layered with vanilla buttercream, encased with milk chocolate ganache and covered in fondant. The top layer was a 5” white chocolate mud cake, also layered with vanilla buttercream, encased with white chocolate ganache and covered in fondant.

I used Americolor Dusty Pink to colour my fondant, and cake board. The gold was brushed on using Metallic Light Gold edible paint by Rainbow Dust. For the name plaque I used the Vladimir Script font in Microsoft Word, flipped it horizontally, and printed it out. I then traced it with parchment paper using a pencil. After rolling out my fondant and using a circle cutter, I flipped my name to the correct side and traced this on the fondant. You can then see the outline of the font, and then use edible paint or an edible pen to write on the fondant. In this instance I used a black edible pen.
The gold balls were made a couple of days before I assembled the cake, and didn’t work out well. They were made with white fondant, left to harden and then painted with the same Metallic Light Gold edible paint that I used on the cake. As they were hard they would not stick to the cake, and kept falling off. So I made new balls out of white fondant, and while they were still soft stuck them to the cake. When they dried I then painted them gold, and the next morning gave them another touch of paint.
For the cupcake toppers a couple of days before the party I rolled out white fondant mixed with a bit of tylose, and cut out heart shapes. The night before I painted them with the Metallic Light Gold edible paint, and left them to dry. They were then nice and hard the next day, and wouldn’t go soft while sitting in the buttercream on the cupcakes.

The cake pops were made using leftover cake and ganache. I dipped them in pink coloured white chocolate, and when the chocolate was set I painted Metallic Light Gold edible paint on them.

On Pinterest I found a tutorial on how to make the tassel garland. They were very easy to make, the hardest part was trying not to burn my fingers with the hot glue gun!!
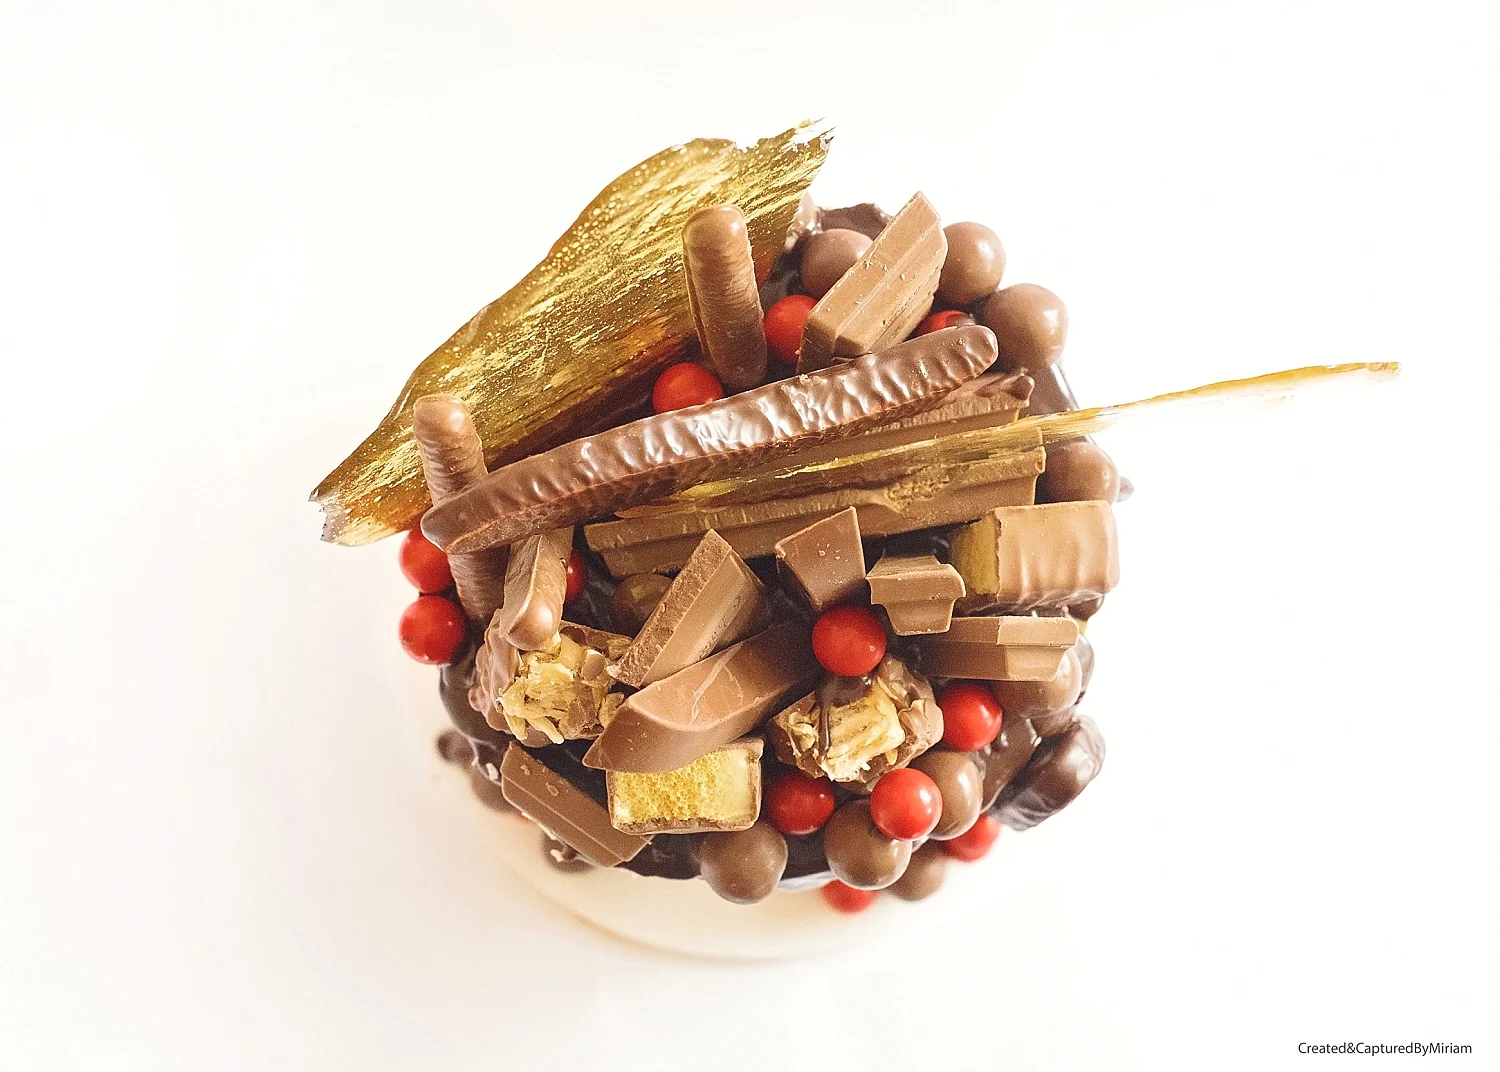
Semi-Naked Drippy Cake
My sons birthday was last week, and we had an afternoon tea on Sunday for family members. He had a birthday party late last month with his friends from school, I blogged earlier about his ice-cream dessert table, and his request not to have a birthday cake then.
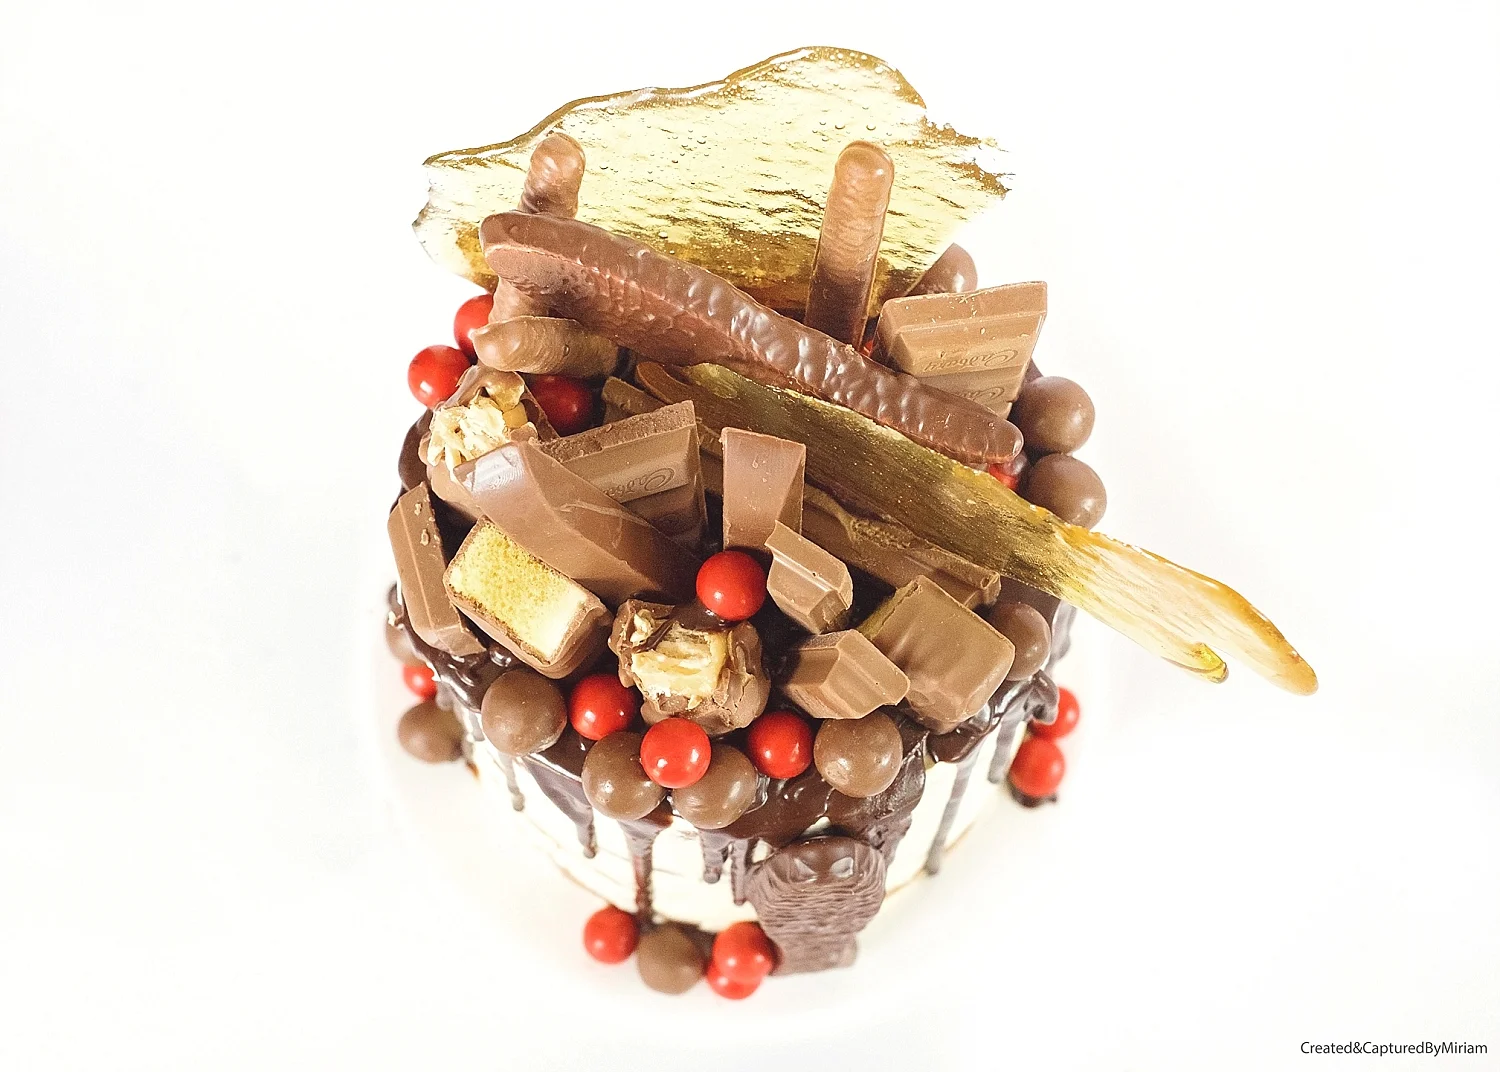
For his afternoon tea I wanted to make him a drippy cake after seeing all of the delicious semi-naked dripping cakes on Instagram, and topped it with his favourite lollies and chocolates.
He wanted a banana cake, so I made a small 6” white chocolate and banana mudcake and layered it with buttercream, fresh bananas and toffee sauce. Decorating the top with the toffee shards, lollies and chocolates was the fun part. I added Chocolate Fingers, Kitkats, Crunchie Bars, Maltesers, Jaffa’s, Chocolate Fish, Picnic Bars, Cadbury Milk Chocolate and Whittaker’s Santé Bars.

The Chocolate Fish which is marshmallow covered in chocolate, and Jaffas are very Kiwi, and are a part of every kid's childhood. When I was a kid a Chocolate Fish was a reward for doing a great job, or doing well at something. The term “I’ll give you a Chocolate fish if you do xxx for me” is still used. Now you can also get small Chocolate Fish which are called Sprats, and along with Jaffas are quite often found on your saucer when you purchase a cup of coffee from a café. Jaffas are the small red balls filled with chocolate and are orange flavoured. I have fond childhood memories of going to the local picture theatre and buying a box of Jaffas to eat while watching the movie. Way back then our picture theatre had wooden floors, and you would always hear people dropping their Jaffa’s on the floor, and hear them rolling down the steps.
Along with his cake I also made Red Velvet Cupcakes with Cream Cheese icing, and topped with fresh strawberries. I didn’t take any close-ups of the cupcakes as we had high humidity and temperatures, and the icing was not behaving. I could have quite happily dived into the fridge with them to cool off. We don’t normally get high temperatures and humidity, so our air-conditioning is opening up all of the windows and doors.
Mason loves Chocolate Brownies so I made him a batch, and iced with a chocolate cheesecake swirl, and topped with a fresh cherry.

My first attempt at making a Gingerbread House
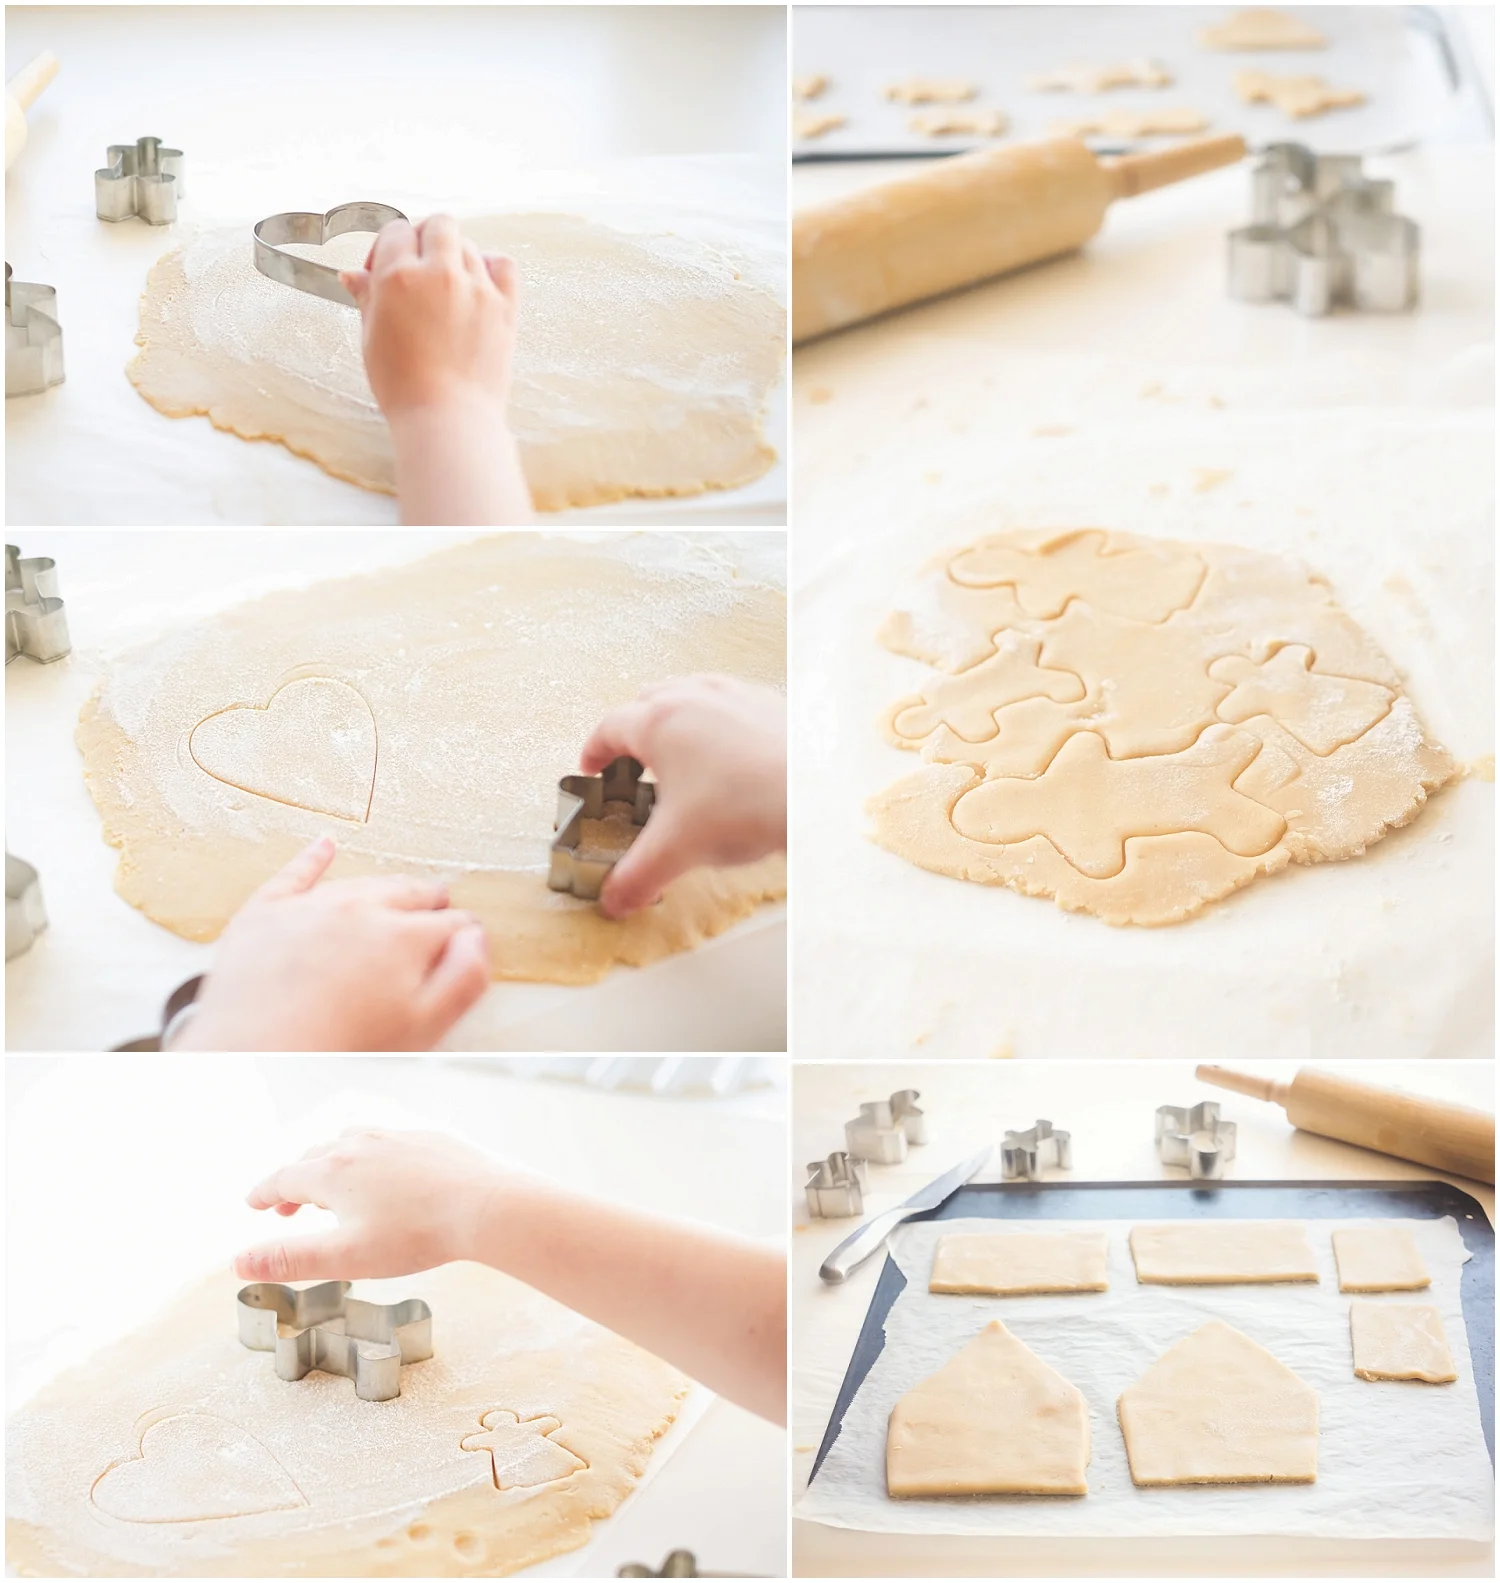
Each year it is a Hancock family tradition to make and decorate gingerbread men to leave out for Santa. This year as the kids are older I thought we could also make gingerbread houses to decorate as well.
As I didn’t have cutters for the house I found some templates on line and printed these out to use. We went around to my Mum’s house again to do the baking and decorating as her kitchen is bigger, and nice and light to take some photos in.
The kids had fun rolling out the dough and making the gingerbread men and houses. As this was the first time we had made gingerbread houses I decided to let them decorate the house, and then put it together at the end. We did one house, and they had half each to decorate.
They love the decorating part, putting on different sorts of lollies to make windows and doors. Once they had finished the house, they started on their gingerbread men. Emme went for the pink and girly look, while Mason tried to make his look like zombies!!
I then started to build the house…..and this is when things started to go downhill!!! I used royal icing and glued the house together, and it lasted only long enough to take some quick photos before falling into a heap. If I had been at home I would have grabbed one of the kids dinosaurs, and put it in the middle and blamed it on the dinosaur!!!
Hindsight is a wonderful thing, and next year I will have a better plan.
1. Research, research and research
2. Overcook each piece and leave overnight so they are rock hard
3. Glue each piece and leave to dry before adding the next piece…yes, hindsight is a great thing
4. Or….buy a premade house, and not have to worry about steps 1,2 and 3.
So I have a year to plan the gingerbread house, fingers crossed for better luck than.
Mason having fun decorating his gingerbread.

Emme having fun with the decorating

The 2 minute gingerbread house.....

Mason’s Ice-Cream Party
This year we decided to have Mason’s birthday party early, as his birthday is in January which is in the middle of the summer school holidays here. So all of his friends go away, and he doesn’t have anyone to come to his party. We had his party the day after school finished for the year, which worked out really well as all of his friends came. He didn’t want a birthday cake this year, and as he loves ice-cream I decided on an ice-cream dessert table.
I brought the ice-cream tubs a few months ago on sale, and then found some digital paper that was similar to make the bunting on the table.

A few hours before the party I pre-rolled the ice-cream, put on a baking sheet and then put in the freezer. Next time I would do this the night before as they were still quite soft. This made it a lot easier when you had a line of hungry boys lined up waiting on ice-cream.

The chocolate sundae cupcakes were chocolate cupcakes covered in buttercream, drizzled in chocolate sauce and topped with a glace cherry. Even though cherries are in season here they are very expensive.


The ice-cream cake pops were really easy to make, and looked great on the table. When I asked some of the boys what flavour ice-cream they wanted they pointed to the cake pops, as they thought they were real ice-cream in cones.

Ice-Cream Cake Pops
I made extra cupcakes when I made my chocolate sundae cupcakes, and put the extras in a food processor and made into fine crumbs. You can also use cake scraps as well.
I then added a couple of Tbsp of the leftover buttercream, and pulsed until it was all combined. You should then be able to form into balls, if not add more buttercream until you can form balls.
You will need your ice-cream cone now to check the size of the cake ball. I used twice the amount of cake ball that I would normally use if I was putting them on a stick. Roll your cake ball and check that it fits inside the ice-cream cone. Place on a greaseproof lined tray. When you have rolled all of your cake balls put them in the fridge to harden up - about 20/30 minutes.
Now they have hardened melt your chocolate (melts or candy melts), and with a spoon drizzle just inside the cone where the cake ball will sit. Then place one of the cake balls in the cone. Continue until you have all of the cake balls in the cones. Put them back in the fridge for 15 mins for the chocolate to harden.
When the cake balls have set in the cones re-melt the chocolate again, and dip each cake ball into the melted chocolate. Then spoon sprinkles over top and leave to set.
Chocolate Brownie Cheesecake Trifles
At the end of each year I make some homemade goodies for my kids teachers. The last few years I have made cupcakes, and last year I made caramels, fudge, and truffles. Last summer I made a big Chocolate Brownie Cheesecake Trifle for a work BBQ dinner, and everyone loved it. So this year I decided to make the same trifle and put it in small glass jars for each teacher.
The recipe was from Life Love and Sugar, which is one of my favourite websites for delicious desserts, cupcakes and cakes. I used her brownie recipe for the bottom of the trifles, then layered with the cheesecake mixture, crushed Oreo's, chocolate whipped cream, and then sprinkled with more Oreo's.
I left out the Baileys as these gifts were for Teachers, and I didn’t think it would appropriate to give my kids teachers alcohol lol!
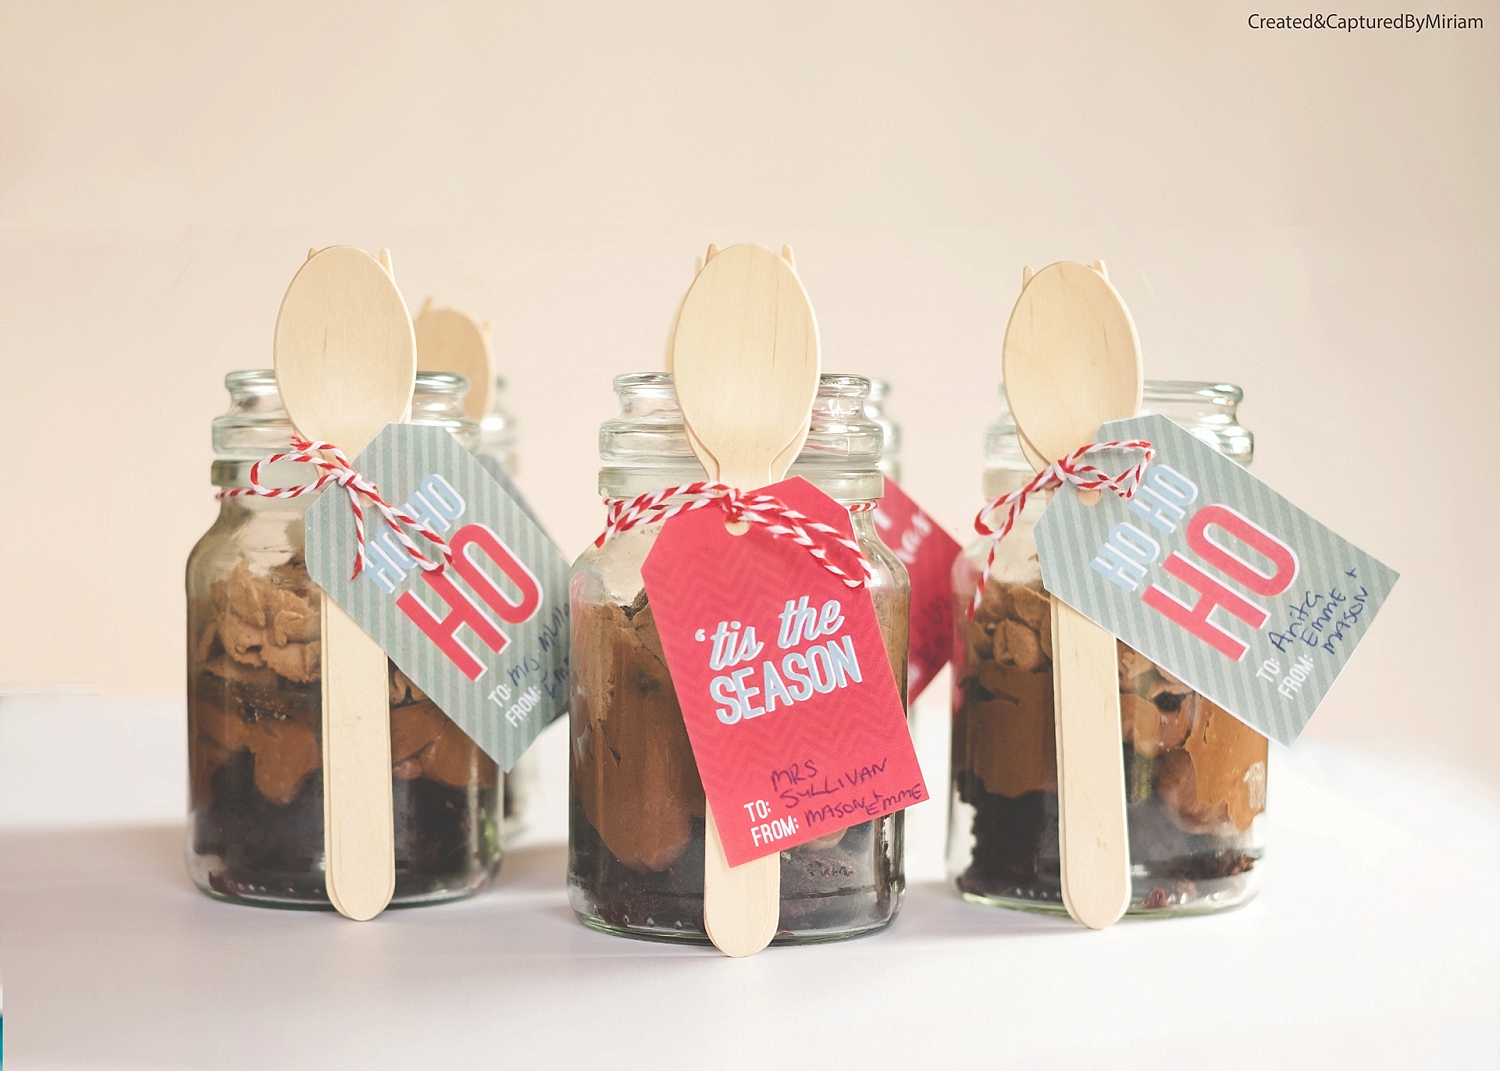
The jars that I used were Moccona 95g coffee jars that I had saved during the year. They were the perfect size, and next time I would fill them right up to the top, as they did settle a bit and ended up been ¾ fill the next day.

I found the perfect size tags from Two Peas & Their Pod, and the twine, wooden spoon and fork were from the local variety shop.


Hello. I'm Miriam, welcome to my blog.
-
February 2018
- Feb 1, 2018 Colour Chase Challenge (White) Feb 1, 2018
-
June 2017
- Jun 25, 2017 Unicorn Birthday Party Jun 25, 2017
-
January 2017
- Jan 8, 2017 Yellow Dahlia's Jan 8, 2017
-
December 2016
- Dec 24, 2016 Christmas Photos Dec 24, 2016
-
November 2016
- Nov 5, 2016 My Baking Buddy Nov 5, 2016
-
July 2016
- Jul 17, 2016 Ombre Buttercream Cake Jul 17, 2016
- Jul 10, 2016 Dancing In The Winter Sun Jul 10, 2016
-
June 2016
- Jun 12, 2016 Pink, White, and Gold Birthday Party Jun 12, 2016
-
April 2016
- Apr 24, 2016 Exploring My Mother In Law's Garden Apr 24, 2016
-
February 2016
- Feb 15, 2016 Trip to Te Rewa Rewa Bridge Feb 15, 2016
- Feb 7, 2016 Summer Beach Holiday Feb 7, 2016
-
January 2016
- Jan 19, 2016 Semi-Naked Drippy Cake Jan 19, 2016
- Jan 2, 2016 Green Tomatoes and Basil Jan 2, 2016
-
December 2015
- Dec 23, 2015 My first attempt at making a Gingerbread House Dec 23, 2015
- Dec 19, 2015 Mason’s Ice-Cream Party Dec 19, 2015
- Dec 19, 2015 All I want for christmas is my two front teeth!! Dec 19, 2015
- Dec 17, 2015 Chocolate Brownie Cheesecake Trifles Dec 17, 2015
-
November 2015
- Nov 20, 2015 King Edward Park Nov 20, 2015
- Nov 13, 2015 Bacon and Maple Syrup Canadian Cupcakes Nov 13, 2015
- Nov 7, 2015 Trip to Nowell's Lake Nov 7, 2015
-
June 2015
- Jun 15, 2015 Frozen Dessert Table Jun 15, 2015
-
January 2015
- Jan 19, 2015 Call Of Duty Dessert Table Jan 19, 2015
-
December 2014
- Dec 22, 2014 Making Gingerbread Men Dec 22, 2014